Concepts
12 minute read
Cluster
In the context of Optimize Live, a cluster is a Kubernetes cluster where the workloads you want to optimize are deployed and on which you have installed the StormForge Agent using the cluster name (clusterName) that you provide.
A cluster can have only one Agent installed. In the context of Optimize Live, “adding a cluster” and “installing the Agent” have equivalent meaning and are used interchangeably.
For installation instructions, see Install the Agent on a cluster in the Install topic.
Workloads
A workload is a component that runs inside one or more Kubernetes pods. In the context of Optimize Live, a workload is a named Workload resource from a namespace in a cluster. Optimize Live observes the resource utilization of workloads in order to produce recommendations—sets of optimal values for requests and limits— for them.
Optimize Live can produce recommendations for the following Workload types: DaemonSet, Deployment, ReplicaSet, ReplicationController, and StatefulSet.
StormForge Agent
The StormForge Agent (“the Agent”) consists of a Kubernetes controller and a Prometheus metrics forwarder. The controller component watches workloads and configuration, while the metrics forwarder component streams a limited set of resource-related metrics to the StormForge platform.
The Agent discovers and gathers metrics for all DaemonSet, HPA, Pod, ReplicaSet, ReplicationController, and StatefulSet types across all the namespaces on the cluster on which it’s installed.
To minimize the footprint in a cluster, Optimize Live requires only the StormForge Agent to be installed on a cluster. By default, the Agent is installed in the stormforge-system namespace.
The StormForge Agent leverages the Kubernetes view role, granting read-only permissions on all resources in the cluster.
Related information:
StormForge Applier
The StormForge Applier is a Kubernetes controller that manages request and limit settings for each workload and applies the recommendations generated by StormForge machine learning. The Applier uses the same StormForge credentials file as the Agent and runs in the same namespace.
Install the Applier if you plan to:
- Deploy recommendations automatically on a schedule of your choosing. This option enables you to skip manually reviewing the recommended settings and ensures your settings track closely to actual CPU and memory use.
- Deploy recommendations on demand. For example, you can apply a single recommendation in any environment as you experiment with recommendations or if you need to quickly deploy a recommendation outside of a schedule.
The Applier applies recommendations using the configured apply method: either patches (PatchWorkloadResources) or a mutating admission webhook(DynamicAdmissionWebhook).
The Applier leverages the Kubernetes edit role, enabling it to update and patch all optimizable workloads (and HPA, if enabled). You can grant additional permissions by specifying additional RBAC in the Helm install command.
Related information:
- Should you install the Applier? in the Install topic
- Additional RBAC permission in the Applier configuration topic
- Apply method setting
- Optimize Live architecture
Schedule
The recommendation schedule defines how frequently Optimize Live generates (and optionally deploys) a recommendation on a workload. By default, a new recommendation is generated once daily (@daily) for a workload, which is considered a best practice.
If auto-deploy is enabled, recommendations are deployed as soon as they’re generated.
To ensure that numerous workloads are not restarted at the same time, Optimize Live staggers the generation and applying of recommendations throughout the schedule period (when the schedule is an ISO 8601 Duration string or equivalent schedule macro). For details, see the Schedule setting topic linked below.
Learn about how the validity period affects the lifetime and request values of recommendations.
Learn about how a workload’s learning period determines how soon recommendations can be auto-deployed after workload discovery.
Related information:
- Schedule setting
Validity period
Validity period is the duration recommendations remain valid after generation. By default, a recommendation’s validity period is based on its workload’s recommendation schedule. If Optimize Live generates recommendations daily, the validity period for each recommendation is automatically set to ≥ 1 day.
When schedule and validity are aligned, Optimize Live makes recommendations based on traffic patterns. For example, it may recommend lower resource requests for Saturday than for Monday.
Validity period can be configured independently, extending recommendation lifetime while new recommendations continue to be generated according to the schedule. For example, with schedule set to @daily and validity period set to P7D, recommendations are generated daily, while each recommendation is valid for 7 days.
Setting the validity period can result in lower savings—Optimize Live can’t use seasonal forecasting as effectively for recommendations used over longer periods.
Key points:
- The default validity period is sufficient for most cases.
- A recommendation shouldn’t be used beyond its validity period.
- Validity period must be greater than the recommendation schedule frequency.
Related information:
- Validity period setting
Learning period
The learning period acts as an automation gate, defining the number of days that must pass after discovering a workload before the Applier is permitted to deploy recommendations automatically.
Because CPU and memory usage patterns can vary from day to day, it can take up to 7 days to collect a robust set of metrics and generate well-informed recommendations. For this reason, the default learning period duration is 7 days (P7D).
During the learning period, Optimize Live collects metrics on the workload and generates preliminary recommendations. You can review and apply these recommendations on demand (by clicking Apply Now on the workload details page), but they can’t be auto-deployed, even if auto-deploy is enabled.
Preliminary recommendations are generated hourly for the first 23 hours, then as defined by the schedule—by default, once daily (@daily)—for the remainder of the learning period and beyond. If auto-deploy is enabled, recommendations are deployed immediately following generation.
See the Recommendations section below for details about how the schedule and learning period determine how frequently recommendations are generated and how soon they can be auto-deployed.
Related information:
- Learning period setting
Auto-deployment sooner than 7 days
If you want to automatically deploy recommendations sooner—for example, for short-running workloads, branch-based deploys, or other ephemeral environments—you can shorten the learning period.
Otherwise, for typical workloads, be aware that metrics collection might not be complete. Consider reviewing and manually applying the preliminary recommendations instead.
The examples in the Recommendations section below show how shortening the learning period changes how soon recommendations can be auto-deployed.
Related information:
- Auto-deploy setting
Recommendations
An Optimize Live recommendation is the set of resource requests and limits that the machine learning algorithm has determined to be optimal for a workload, based on historical utilization observations.
Optimize Live can produce recommendations for the following items:
- Kubernetes Workload types: DaemonSet, Deployment, ReplicaSet, ReplicationController, and StatefulSet
- HPA, when enabled and scales on at least one resource metric (see HPA recommendations later in this topic)
Preliminary recommendations during the learning period
After installing Optimize Live or adding workloads, the learning period begins for the new workloads.
The learning period acts as an automation gate, preventing the Applier from deploying recommendations automatically for a defined number of days (by default, 7 days).
Recommendations generated during the learning period are referred to as preliminary recommendations: you can review them and apply them on demand (by clicking Apply Now on the workload details page), but they cannot be auto-deployed, even if auto-deploy is enabled.
Preliminary recommendations are generated at the intervals below, using the metrics collected up to that point in time:
- Within 10 minutes after installing Optimize Live or adding a workload. The first preliminary recommendation is available for review.
- Then, hourly for the first 23 hours. You might notice the recommendations becoming more refined as metrics collection continues.
- After 23 hours, they’re generated as defined by the recommendation schedule - by default, once daily (
@daily), for the remainder of the learning period and beyond.
When the learning period ends, if auto-deploy is enabled, the recommendations are applied automatically as soon as they’re generated. Otherwise, you can apply them on demand.
To ensure that numerous workloads are not restarted at the same time, Optimize Live staggers the generation and applying of recommendations throughout the schedule period (when the schedule is an ISO 8601 Duration string or equivalent schedule macro). See the Schedule setting topic linked below.
We recommend waiting 7 days before applying recommendations because it typically takes about 7 days to complete a cycle of usage patterns on which to generate a recommendation that you can apply.
Schedule and learning period examples
The schedule and learning period settings determine how frequently recommendations are generated and how soon they can be auto-deployed, as shown in the examples below.
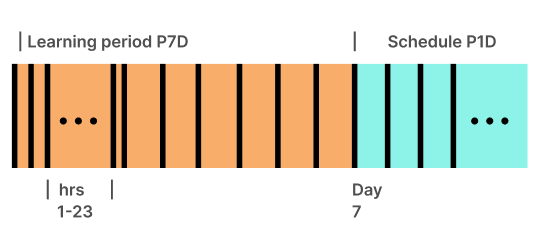
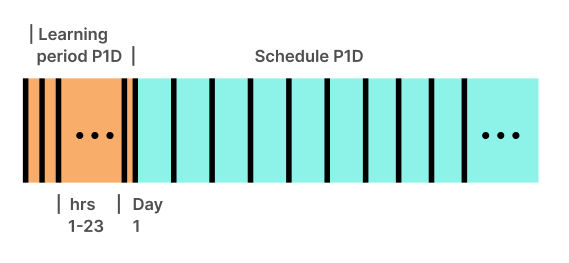
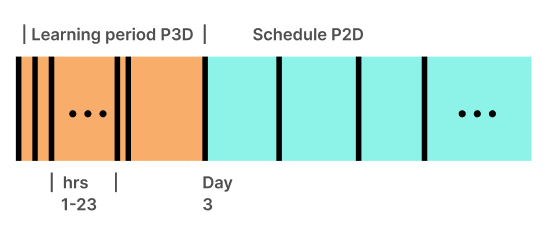
As mentioned above, preliminary recommendations are generated at 10min, hourly during hours 1-23 after installation or workload discovery.
- Default values: Schedule
P1D(or@daily), learning periodP7D
The first auto-deployable recommendation is available on day 7.

If you choose to shorten the duration of the learning period in specific scenarios as described in Shorter learning periods above:
-
Schedule
P1D(or@daily), learning periodP1D
The first auto-deployable recommendation is available 24 hours (1 day) after workload discovery.

-
Schedule
P2D, learning periodP3D
The first auto-deployable recommendation is available on day 3 after workload discovery.

HPA recommendations
If a HorizontalPodAutoscaler (HPA) is enabled on the workload, Optimize Live detects the metrics that the HPA is configured to scale on and responds as shown in the following table.
| When an HPA scales on… | Optimize Live provides… |
|---|---|
| One or more resource metrics (CPU, memory) | Optimal requests and limits values, HPA target utilization |
| One resource metric and other multiple metrics | Optimal requests and limits values, HPA target utilization |
| Any metric(s), but no resource metric | Optimal requests and limits values |
Related information:
- Schedule and learning period settings
- Apply method setting
How Optimize Live generates recommendations
Optimize Live generates recommendations using our patent pending machine learning. Our machine learning examines the metrics collected* (including CPU and memory requests and usage) and monitors usage patterns and scaling behavior to come up with the optimal settings for:
- CPU requests and limits
- memory requests and limits
- HPA target utilization, if a workload is scaling on the HPA (see HPA recommendations above for details)
When generating a recommendation, the machine learning generates 3 candidate recommendations, one for each possible “optimization goal”:
- savings - most aggressive candidate
- reliability - least aggressive
- balanced - default, falls between the other 2 candidates
The more data that we collect, the better the recommendation that we generate, and our machine learning weights recent data more heavily. The recommendation schedule defines how often a recommendation is deployed and for how long that recommendation is considered “not stale.” For example, a recommendation with a daily schedule (the default value and best practice) should be deployed daily.
Our machine learning also detects the following events and reacts accordingly:
- Spikes in a workload. These events are considered when generating recommendations.
- Scale-down events. Their duration determines whether a recommendation is generated. See Scale-down events below for details.
Best practice: To realize the most savings, consider generating and deploying recommendations frequently.
*For the full list of metrics, run:
helm show readme oci://registry.stormforge.io/library/stormforge-agent \
| grep "## Workload Metrics" -A 18
Scale-down events
When a workload is scaled down for any reason, by any actor, the duration of the event determines whether a recommendation is generated:
- 0 replicas for more than 75% of the time within a 7-day period: No recommendation provided. Optimize Live cannot collect sufficient metrics about that workload. When this occurs, you’ll see a message in the UI.
- 0 replicas for any shorter duration: Recommendation provided, and you’ll see a message in the UI.
Related information:
- Optimization goal setting
How the Applier applies recommendations
As described in the Applier section of this topic, install the Applier if you plan to auto-deploy recommendations or if you want to apply them on demand.
The Applier applies recommendations using the configured apply method: either patches (PatchWorkloadResources) or a mutating admission webhook(DynamicAdmissionWebhook).
To ensure that numerous workloads are not restarted at the same time, the generation and applying of recommendations is staggered throughout the schedule period (when the schedule is an ISO 8601 Duration string or equivalent schedule macro). For details, see the Schedule setting linked at the end of this topic.
As soon as a recommendation is applied, the recommendation status is updated to either Applied or FailedToApply.
| Icon | Status | Validation | Rolled back |
|---|---|---|---|
| ✔️ | Applied | -- | -- |
| ❗️ | FailedToApply | -- | -- |
If the entire recommendation was applied successfully, StormForge then attempts to validate the rollout.
Rollout validation
After successfully applying a recommendation (whether by using patches or by using a webhook), StormForge monitors the workload status for 5 minutes (default value). If the workload enters an error state while being monitored, StormForge rolls back the applied recommendation and sets the recommendation status to FailedToApply (❗️).
During this monitoring period, StormForge checks for conditions such as CPU throttling, OOMKills, CrashLoopBackOff, pod start-up time, and so on.
Monitoring terminates when one of the following validation conditions is met:
- Timed out
The recommendation was applied but rollout validation didn’t complete within the monitoring period. No pods are in CrashLoopBackoff, so changes have not been rolled back. - Workload Became Ready
The recommendation is applied and the rollout is validated (all pods are healthy after applying the recommendation) within the monitoring period. - Workload Became Unhealthy
The rollout didn’t complete within the monitoring period. StormForge detected that either the rollout stalled with an error (such asProgressDeadlineExceeded) or at least one pod was in CrashLoopBackoff. If the workload became unhealthy, by default StormForge will roll back its changes.
| Icon | Status | Validation | Rolled back |
|---|---|---|---|
| ✔️ | Applied | Timed out | No |
| ✔️✔️ | Applied | Workload Became Ready | No |
| ❗️ | FailedToApply | Workload Became Unhealthy | Yes |
What gets rolled back?
The rollback operation reverts only the changes made to fields managed by stormforge at the time the patch was applied.
If an external field manager takes ownership of a stormforge-managed field after a patch is applied, a rollback is not performed, even if the workload is unhealthy. StormForge recognizes that another mechanism is available to heal the workload.
You can disable this rollback feature (see link at the bottom of this topic). If rollback is disabled, you might see the following icon and status in lieu of FailedToApply.
| Icon | Status | Validation | Rolled back |
|---|---|---|---|
| ⚠️ | Applied | Workload Became Unhealthy | No |
Workload drift reconciliation
You can control whether the Applier automatically reconciles workload drift, ensuring that recommended settings are maintained and not overwritten during CI/CD or deployment activity on the cluster. For details, see Continuous reconciliation in the Applier configuration topic.
Related information:
- Should you install the Applier? section in the Install topic
- Apply method setting
- Schedule setting
- Disable rollback