Install Optimize Live as an EKS add-on
4 minute read
If you’re running an Amazon EKS cluster, you can install StormForge Optimize Live as an EKS add-on in one of two ways:
Install using the EKS UI and StormForge UI
Get the add-on
-
Open two browser windows side by side.
-
In one window, navigate to and log in to your Amazon EKS cluster.
-
On the cluster page, add the Add-ons tab, and then click Get more add-ons.
-
On the Select add-ons page, scroll to the AWS Marketplace add-ons section.
-
From the Any category menu, select cost-management.
-
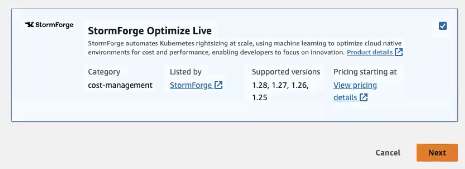
On the StormForge Optimize Live add-on card, select the check box in the upper right (see below); then, click Next.
-
Note: If you don’t have a StormForge account, go to this section at the end of this topic, complete the steps. Then, come back to this section and move to step 8.
-
On the Configure selected add-ons settings page, expand the Optional configuration settings section.
-
In the Add-on configuration schema section, you can customize your installation the same way you can customize a Helm install.
-
Copy the following placeholder text into the Configuration values text area. In a later step, you’ll replace this text with the values generated on the StormForge Access Credentials page.
authorization:
  issuer:
  clientID:
  clientSecret:
standbyMode: false
Get the cluster credentials and copy them to EKS configuration values
-
In the second browser window, go to app.stormforge.io.
-
In the left navigation, click Settings > Access Credentials, and press Add Credential.
-
In the Create Credential window, enter your EKS cluster name or a unique string to help you identify the credential. Then, click Create.
-
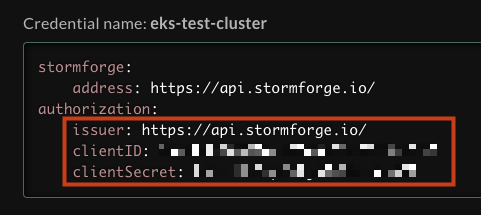
Copy the issuer, clientID, and clientSecret from the new credential.
-
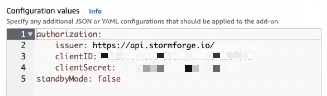
In your EKS browser window, copy the new credential into the Configuration values text area, replacing the empty placeholder. The Advanced configuration panel will look like this:
-
In the Conflict resolution method, select Override.
-
Click Next, and then click Next again.
Validate the installation
In the StormForge left navigation, click Settings > Cluster Management and confirm the new cluster was added.
Install using the EKS CLI and StormForge UI
This method installs Optimize Live in standby mode.
Get the add-on
Run the following command, replacing CLUSTER_NAME with the name of your cluster and REGION with your region.
eksctl create addon --cluster CLUSTER_NAME --name stormforge_optimize-live --version "v2.8.0-eksbuild.1" --region REGION --force
This installs the add-on with the default values provided by StormForge. The Agent pod (workload-agent) is in standby mode, and the Prometheus agent is not started yet.
Validate the installation
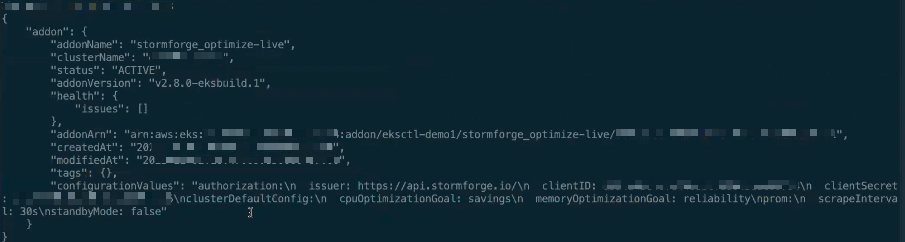
To validate the installation, run:
aws eks describe-addon --cluster-name CLUSTERNAME --region REGION --addon-name stormforge_optimize-live
The output will look something like this:
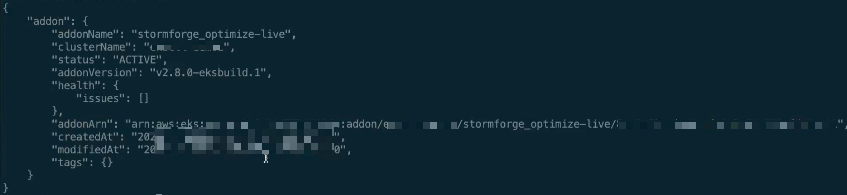
In the output, look for "status": "ACTIVE" and confirm that there are no issues in the “health” section:

Manage your StormForge subscription
In Amazon EKS, go to the Add-ons page. To get the stormforge_optimize-live add-on, click the Manage subscription link.
- No StormForge account?
If you don’t have a StormForge account, complete these steps to get one. Then go to the next section.
Create a config.yaml file
This config.yaml file updates an existing cluster with the EKS add-ons. You can copy the example below into your EKS browser window.
apiVersion: eksctl.io/v1alpha5
kind: ClusterConfig
metadata:
  name: "NAME"
  region: "REGION"
addons:
- name: stormforge_optimize-live
  version: v2.8.0-eksbuild.1
  configurationValues: |-
    authorization:
      issuer: https://api.stormforge.io/
      clientID: "CLIENT_ID"
      clientSecret: "CLIENT_SECRET"
    standbyMode: false
  resolveConflicts: overwrite
Get the cluster credentials
-
In a browser window, go to app.stormforge.io.
-
In the left navigation, click Settings > Access Credentials, and press Add Credential.
-
In the Create Credential window, enter your EKS cluster name or a unique string to help you identify the credential. Then, click Create.
-
Copy the issuer, clientID, and clientSecret lines from the new credential.
-
Replace the issuer, clientID, and clientSecret the EKS
config.yamlfile with the new credential information you just copied. Be sure to copy it to theaddons.configurationValues.authorizationsection.
Apply the YAML config and activate the add-on
Run the following command to apply the config file and get it out of standby mode:
eksctl update addon --config-file config.yaml --force
You don’t need to specify the cluster name and region as command parameters - they’re already in the config.yaml file.
After a minute or two, you should see output similar to the following:
Continue your subscription
You have to continue to subscribe to this add-on.
- Sign in to aws.amazon.com, and in the AWS Marketplace Buyer website, search for StormForge Optimize Live.
- On the StormForge Optimize Live product page, click Continue to Subscribe in the upper right.
- Review the agreement and then click Create Contract.
Get a StormForge account
Complete this step only if you don’t have a StormForge account. It takes only a few minutes to get up.
- In a separate browser window, go to stormforge.io/signup to get your free StormForge trial license.
- Check your email for a confirmation message from us.
- When you receive the message, click the confirmation link to start your trial.