Testing with GitHub Actions
6 minute read
Please note
The content on this page pertains only to the new Platform StormForge Performance Testing environment at https://app.stormforge.io/perftest.
Similar integrations with GitHub Actions can be setup using the forge CLI with the Standalone Performance Testing environment.
This guide shows an example GitHub Actions workflow utilizing Performance Testing to perform automated load tests after each deployment.
We also setup a scheduled load tests (e.g. once a week) against your application. A validation run is performed against the staging environment for every push to ensure the load test definition is up to date.
For this guide we assume you have general knowledge of GitHub Actions and how it works. You also need the permissions to configure secrets in your repository or organization.
The code is available on GitHub at thestormforge/perftest-example-github-actions. Our example service is written in Go, but you don’t need to know Go, as we will only discuss the Performance Testing related steps.
Note that this is just an example and your actual development workflow may differ. Please take this as an inspiration how to use Performance Testing with GitHub Actions.
Preparation
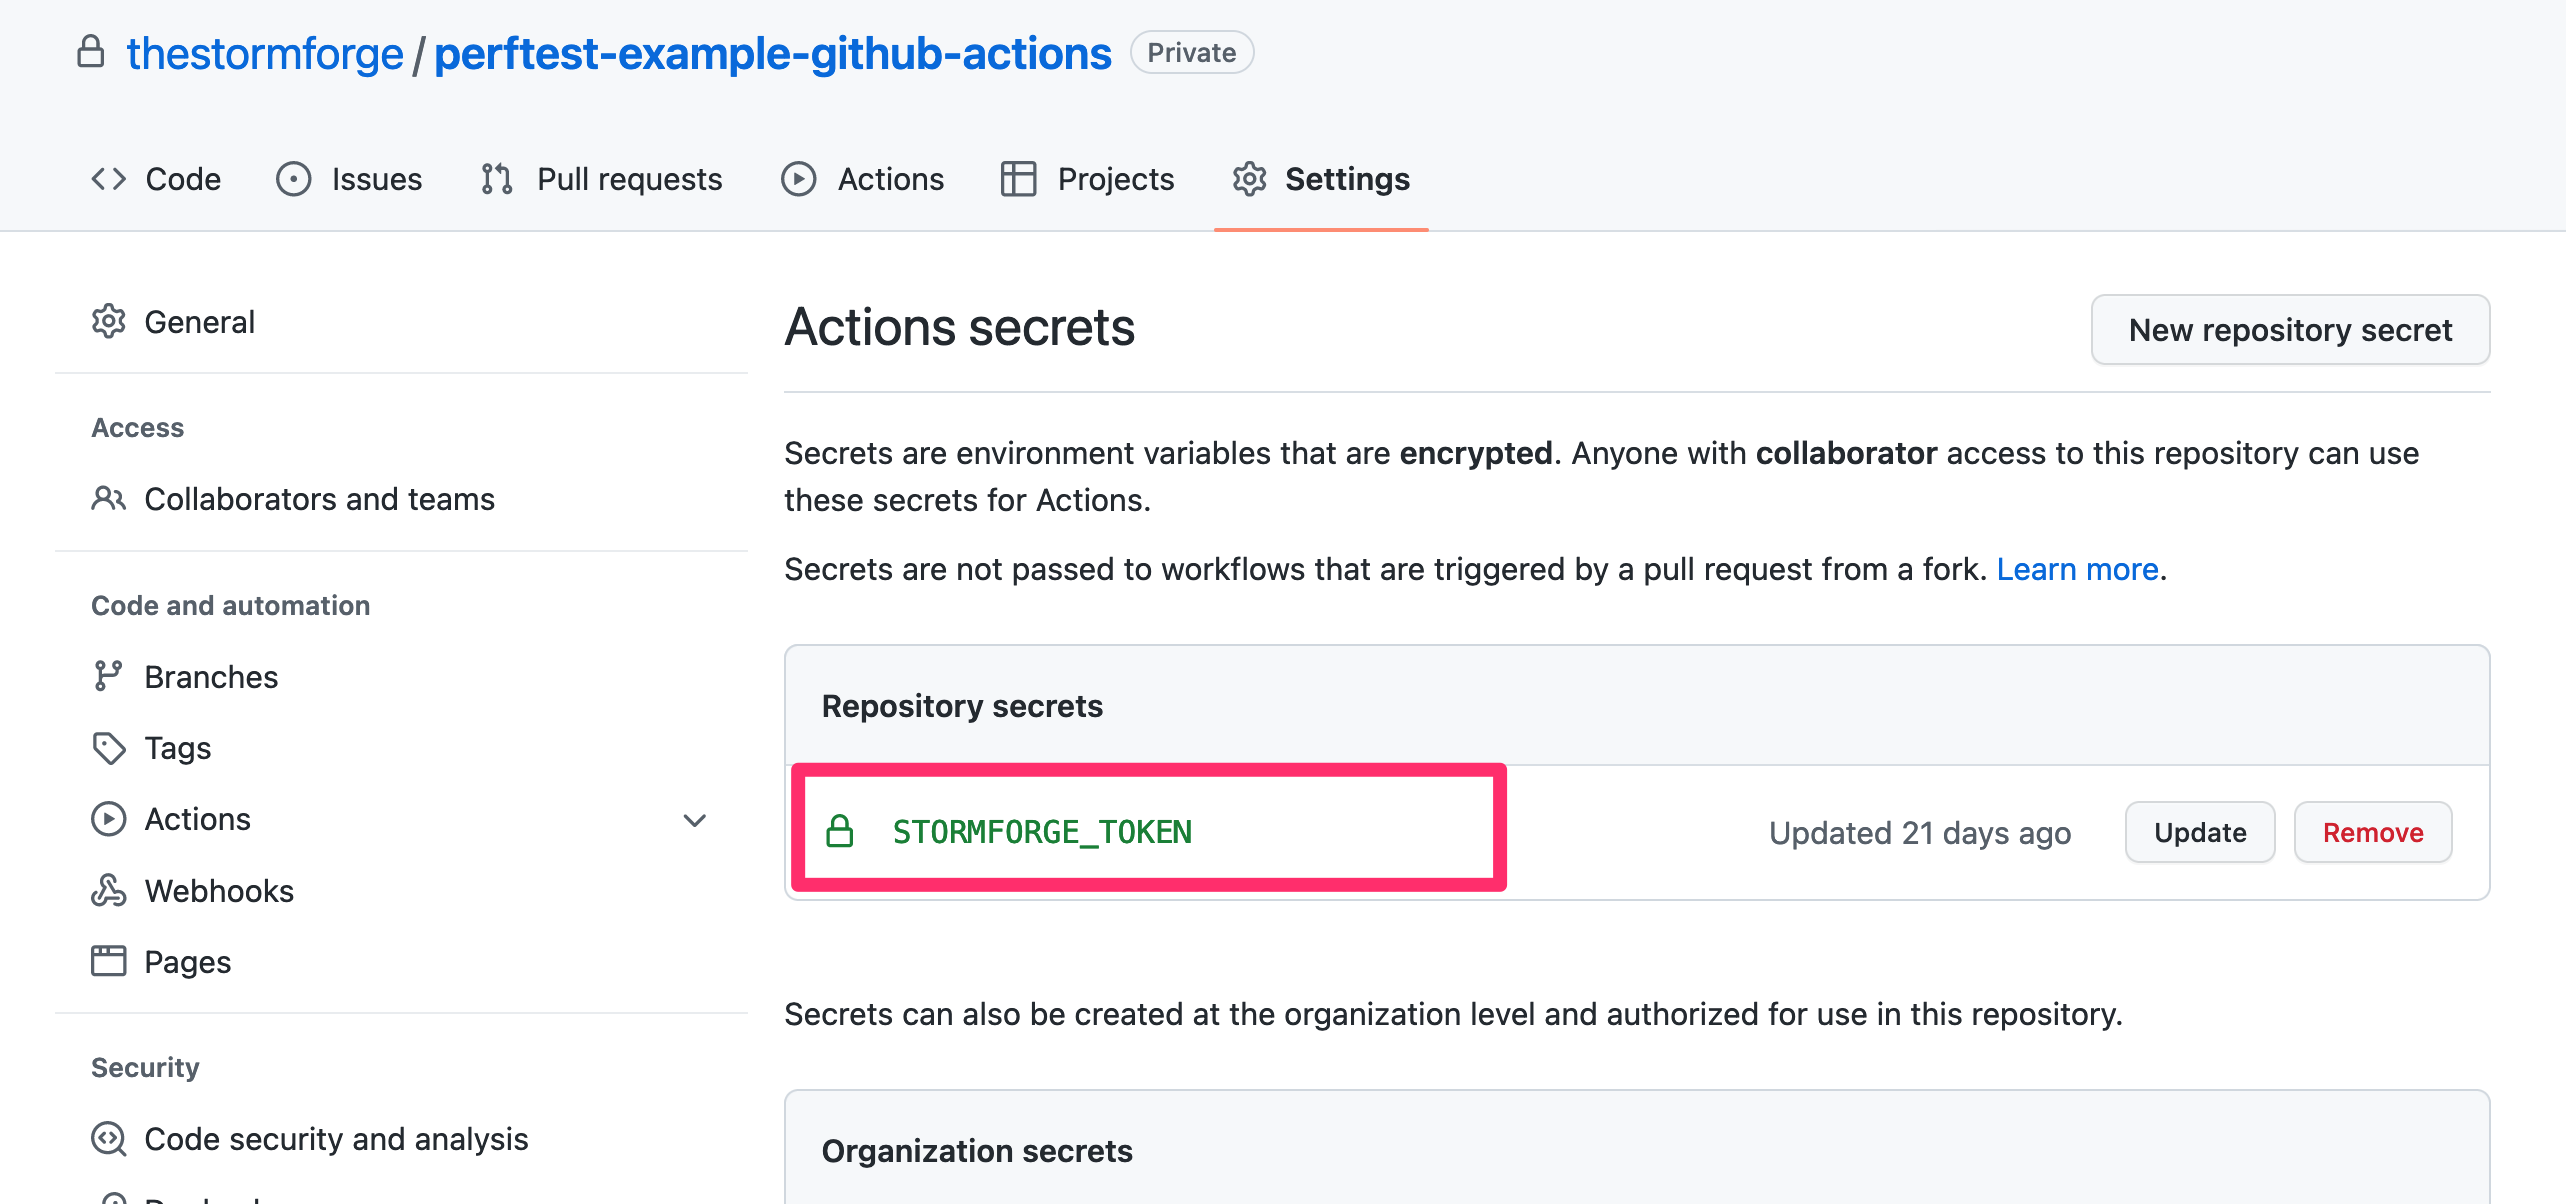
Please follow the Getting Started with the StormForge CLI guide to create the authentication secret and configure them in your repository.
Follow the steps described in GitHub’s Creating and storing encrypted secrets guide. It should look like this, when you are done:
Note
You can also configure secrets on the organization level. If you have multiple repositories using StormForge Performance Testing, this might be easier to manage.Inside the workflow these secrets can now be referenced as ${{ secrets.STORMFORGE_TOKEN }}.
These secrets are not environment variables, so we need to explicitly pass them along to every step where we use the stormforge CLI.
Also note that you may need to create dummy testcases ahead of time in the Performance Testing application so that the CI/CD scripts can update them. This can be done through the web application or through the CLI with a command like this:
stormforge create test-case <repository name>-<target environment> \
  --from-file="loadtest/loadtest.mjs" \
  --define ENV=\"<target environment>\"
In the example in this guide, the test case is named after the repository name and the target environment separated by a dash,
such as perftest-example-github-actions-staging and perftest-example-github-actions-production.
You will need to create placeholder test cases for all test runs you wish to launch in your CI/CD pipeline.
Steps
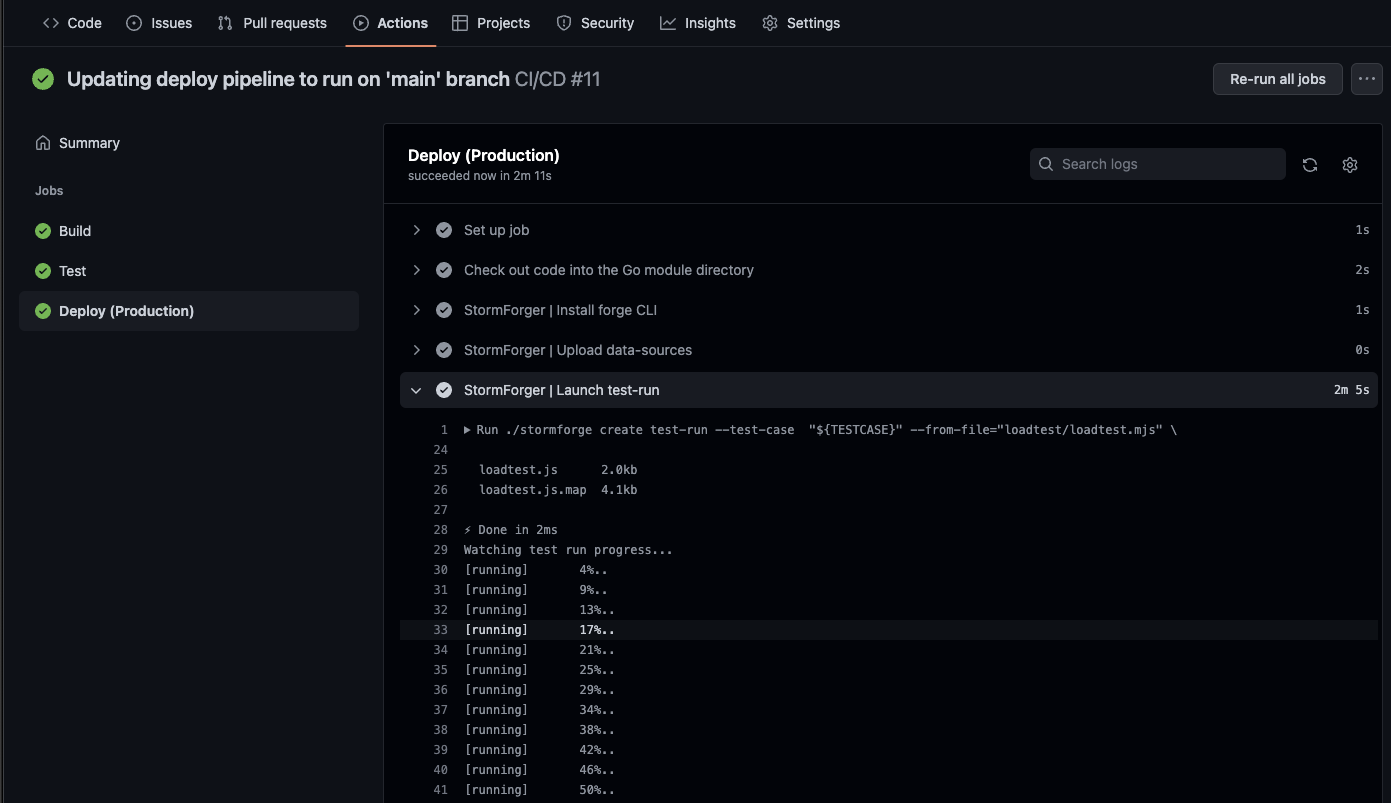
Our workflow file cicd.yml consists of three jobs: build, test and deploy.
The first two are run for every push while deploy is only run for changes on the master branch.
Our goal is to run the load test in validation mode against the staging target in the test job and against the production environment in the deploy job.
For both jobs we follow the same steps:
- Setup the
stormforgeCLI - Manage data sources
- Build the Test Run and Launch It
Let’s go through each step one by one.
Note
Below we show each step with all relevant environment variables. Since there are certain repetitions, the real workflow deduplicates some of them by moving them to the job and workflow level.Setup the stormforge CLI
First, we need to install the stormforge CLI(stormforge cli):
- name: StormForge Performance Testing | Install latest stormforge CLI
  run: |
    wget https://downloads.stormforge.io/stormforge-cli/latest/stormforge_linux_amd64.tar.gz -O stormforge_linux_amd64.tar.gz
    tar -xzf stormforge_linux_amd64.tar.gz
    ./stormforge ping
  env:
    STORMFORGE_TOKEN: ${{ secrets.STORMFORGE_TOKEN }}
GitHub Actions runs every job in a separate VM and by default does not share any data.
Thus we need to reinstall the CLI for every job where we want to use it.
We pass along the STORMFORGE_TOKEN secrets so we can run the ./stormforge ping command.
This performs an authorized ping against the StormForge API and verifies that the authentication secrets are valid and usable.
Manage Data Sources
Data Sources allow a Test Run to pick random data out of a predefined pool, e.g. a product out of all the available inventory. If you don’t use data sources, you can skip this step.
In our workflow, we use the script ./scripts/data-source.sh to generate a CSV file for our test, but this can be easily changed or extended to download the latest inventory data from a database.
- name: StormForge Performance Testing | Upload data-sources
  run: |
    ./scripts/data-source.sh "${TARGET_ENV}"
    ./stormforge create data-source --from-file *.csv --name-prefix-path="${{ github.event.repository.name }}/${TARGET_ENV}/" --auto-field-names
  env:
    STORMFORGE_TOKEN: ${{ secrets.STORMFORGE_TOKEN }}
    TARGET_ENV: "production"
We prefix all uploaded CSV files with our repository name and the target environment to make them easily distinguishable in the data source management of the Performance Testing application.
This step is the same for both the staging and production environment, except for the value of the TARGET_ENV variable.
Build the Test Run and Launch It
Note
Heads Up! Testing in production can be dangerous. Make sure the configured arrival rate/load in your Test Case repo is low enough so you don’t trigger any incidents. The goal here is not to run stress tests regularly but to ensure we do not experience any major performance regression with nominal load.As the last step we launch the Test Run. Here we pass in the environment via --define ENV=\"name\":
./stormforge create test-run --test-case  "${TESTCASE}" --from-file="loadtest/loadtest.mjs" \
  --define ENV=\"${TARGET_ENV}\" \
  --title="${TITLE}" \
  --notes="${NOTES}" \
  --label="git-ref=${{github.ref}}" \
  --label="gh-commit=${{github.event.head_commit.url}}" \
  --label="gh-workflow=${{github.workflow}}" \
  --label="gh-run-url=https://github.com/${{github.repository}}/actions/runs/${{github.run_id}}" \
  --label="gh-actor=${{github.actor}}" \
  ${LAUNCH_ARGS}
This allows us to modify the target system urls or just specify global variables in the loadtest.mjs file:
var config;
if (ENV == "production") {
  config = {
    dsPrefix: "example-github-actions/production/",
    host: "https://testapp.loadtest.party",
  }; // production config
} else if (ENV == "staging") {
  config = { ... }; // staging config
} else {
  throw new Exception("unknown environment");
}
Note
To learn more about defining variables or loading modules checkoutstormforge create test-case --help.
The complete step looks like this:
- name: StormForge Performance Testing | Launch Test Run
  run: |
    ./stormforge create test-run --test-case "${TESTCASE}" --from-file="loadtest/loadtest.mjs" \
      --define ENV=\"${TARGET_ENV}\" \
      --title="${TITLE}" \
      --notes="${NOTES}" \
      --label="git-ref=${{github.ref}}" \
      --label="gh-commit=${{github.event.head_commit.url}}" \
      --label="gh-workflow=${{github.workflow}}" \
      --label="gh-run-url=https://github.com/${{github.repository}}/actions/runs/${{github.run_id}}" \
      --label="gh-actor=${{github.actor}}" \
      ${LAUNCH_ARGS}
  env:
    LAUNCH_ARGS: "--validate"
    NOTES: |
      Head Commit Message:
      ${{github.event.head_commit.message}}
    TITLE: "${{github.workflow}}#${{github.run_number}} (${{github.ref}})"
    TARGET_ENV: "staging"
    TESTCASE: "demo/${{ github.event.repository.name }}-staging"
    STORMFORGE_TOKEN: ${{ secrets.STORMFORGE_TOKEN }}
In this step we attach a lot of information to the Test Launch.
The --notes, --title and --label flags provide metadata to enrich the Test Run report.
With LAUNCH_ARGS: "--validate" we are launching the Test Run only in validation mode for our staging environment.
For the production environment we are instead passing in LAUNCH_ARGS: "--nfr-check-file=./loadtest/loadtest.nfr.yaml" which performs the Non-Functional Requirement checks after the Test Run has finished.
Scheduled Test-Run Execution
Finally, we want to run the load test once a week. GitHub Actions allows this via scheduled events:
on:
  schedule:
    # Do a run every sunday night
    - cron: 12 5 * * 0
Since we don’t want to run through all phases (build, test, deploy) nor do we want to redeploy to production for this, we use a separate workflow that runs every week and only contains the already discussed steps to launch a Test Run.
Summary
To summarise, we used GitHub Actions to download our CLI, upload data sources and launch a Test Run for every environment in our development cycle. A weekly job verifies that the load test continuously works and no other factors introduce regressions. By using NFR checks, we automatically verify that our non-functional requirements are fulfilled.